 Raccoon Wiki
Settings
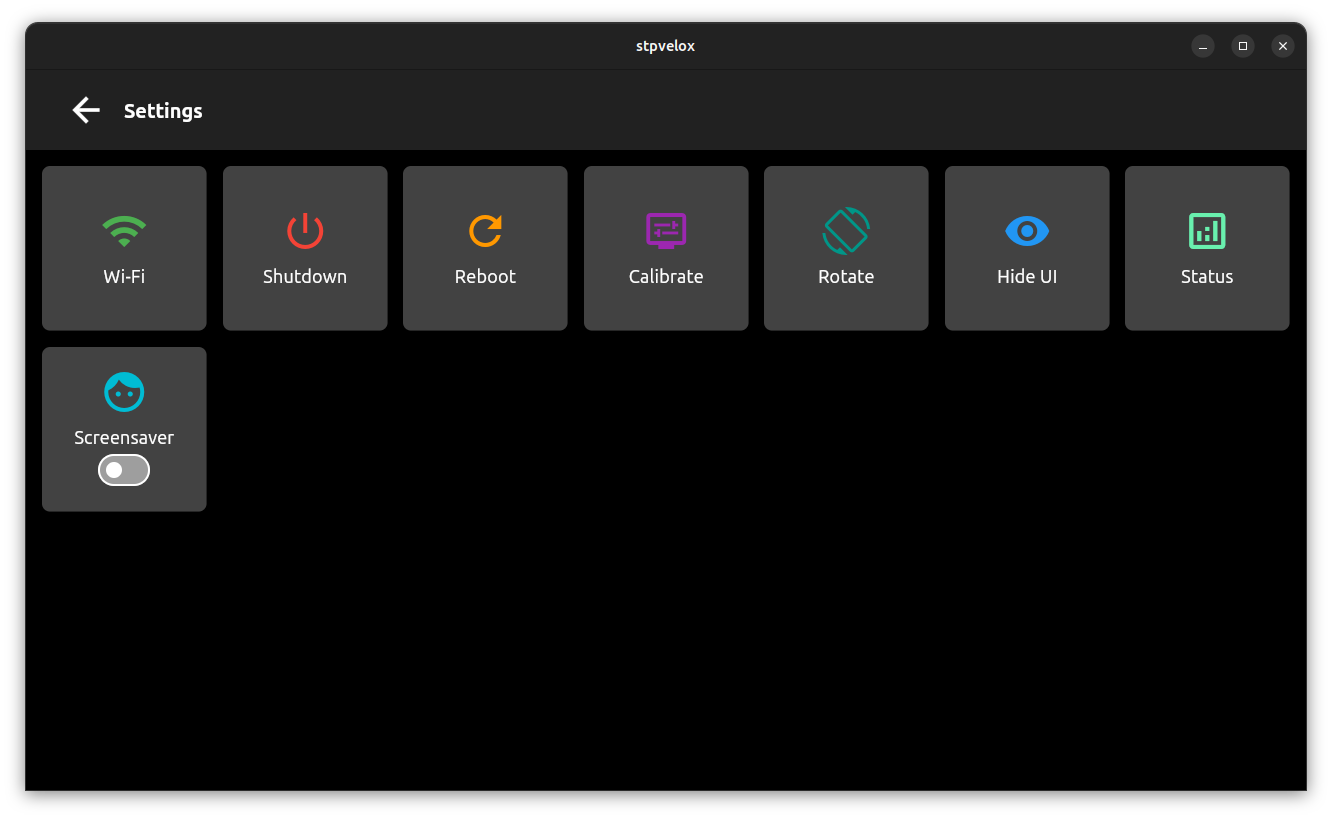
The Settings screen is a two-tier hierarchy. The top-level screen shows six tiles; each tile opens a dedicated sub-screen with its own controls. There is no single flat list of settings — you must navigate into the appropriate sub-screen to find what you need.
Concept: Two-Tier Settings Model
Settings in BotUI come from two different sources with different persistence mechanisms. Understanding this helps you find the right screen and avoid confusion when a setting does not seem to survive a restart.
graph LR
    subgraph "BotUI SharedPreferences\n(persisted across reboots)"
        ROT["Screen rotation\n(screen_rotation key)"]
        SCRN["Screensaver toggle\n(shared_preferences)"]
        TOUCH["Touch calibration matrix\n(touch_calibration key)"]
    end
    subgraph "OS / Service Layer\n(managed by Linux)"
        WIFI["Wi-Fi credentials\n(NetworkManager)"]
        SYSAUTO["Service autostart\n(systemd enable/disable)"]
    end
    subgraph "Settings Sub-Screens"
        DISP["Display"]
        NET["Network"]
        SYS["System → Services"]
    end

    DISP --> ROT
    DISP --> SCRN
    DISP --> TOUCH
    NET --> WIFI
    SYS --> SYSAUTO
The Display sub-screen writes to SharedPreferences — these settings are owned by BotUI and survive the application restarting. The Network sub-screen issues commands to NetworkManager; credentials are stored by the OS, not by BotUI. The System → Services screen issues systemctl enable/disable commands; autostart state lives in systemd unit files, not in BotUI.
Neither tier touches raccoon’s Python configuration files (robot.yml, raccoon.calibration.yml, etc.) — those are project-level settings managed by the toolchain, not by BotUI.
Top-Level Tiles
| Tile | Icon colour | Sub-screen |
|---|---|---|
| Network | Green | Wi-Fi and LAN management |
| Camera | Blue | Camera feature configuration |
| Display | Purple | Calibrate, Rotate, Screensaver, Hide UI |
| System | Orange | Services, Reboot, Shutdown |
| App Status | Teal | Installed component versions |
| Robot | Pink | Robot personality (read-only inspector) |
Network
The Network sub-screen is a two-tile menu:
- Manage Connection — connects to Wi-Fi networks or configures hotspot/LAN mode.
- Network Scan — scans Wi-Fi channels and displays signal-strength data for nearby access points.
Wi-Fi Client Mode
Allows the device to join an existing wireless network. New networks can be added manually. Once connected, networks are saved automatically so the password does not need to be re-entered. If a saved network is nearby and the robot has no internet connection, it reconnects automatically.
Note: A USB keyboard must be plugged into the Wombat to type the Wi-Fi password.
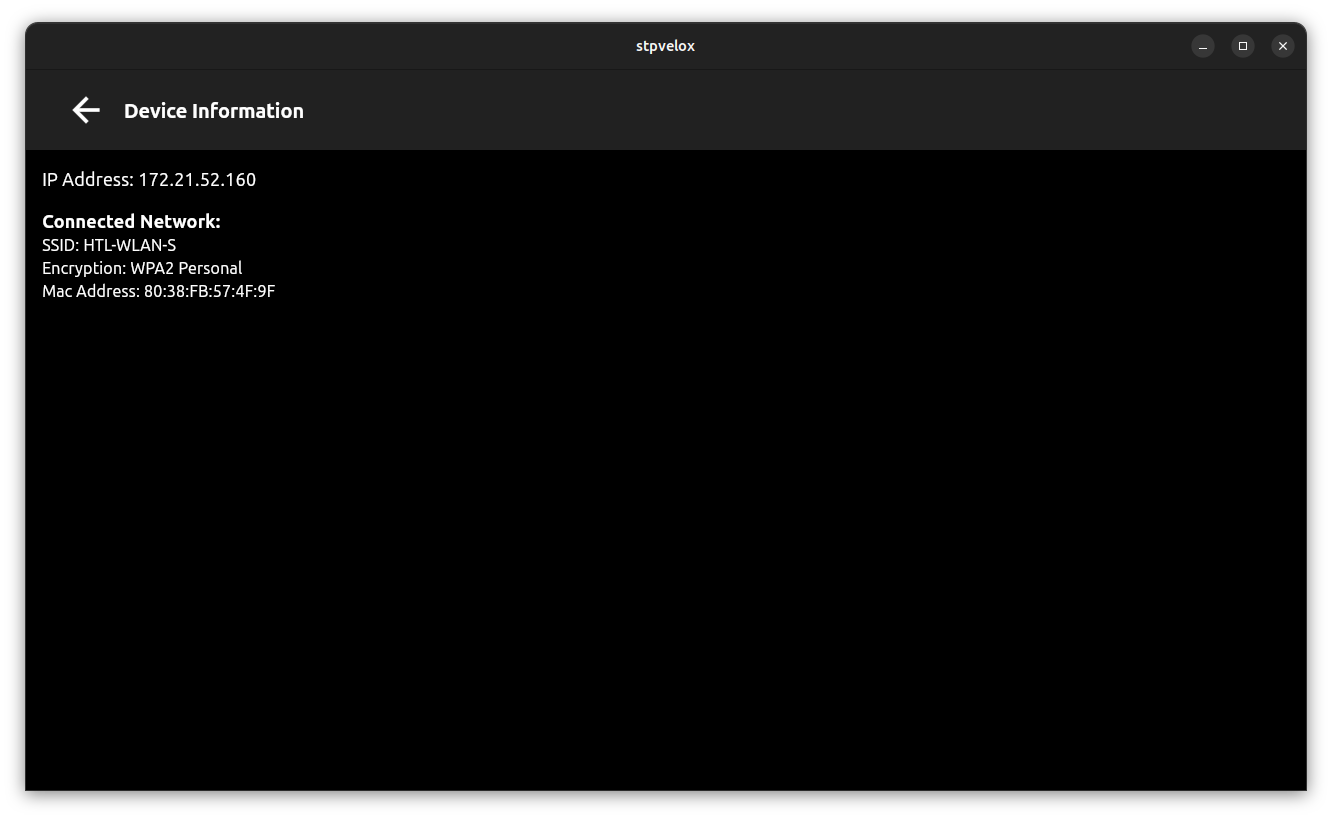
After connecting, open Manage Connection → Device Info to see the assigned IP address — you will need this address to connect raccoon-cli from your laptop.
Troubleshooting: If the robot connects successfully (status turns green) but your laptop cannot reach it, reboot the Wombat. A known NetworkManager bug occasionally requires this.
Hotspot Mode
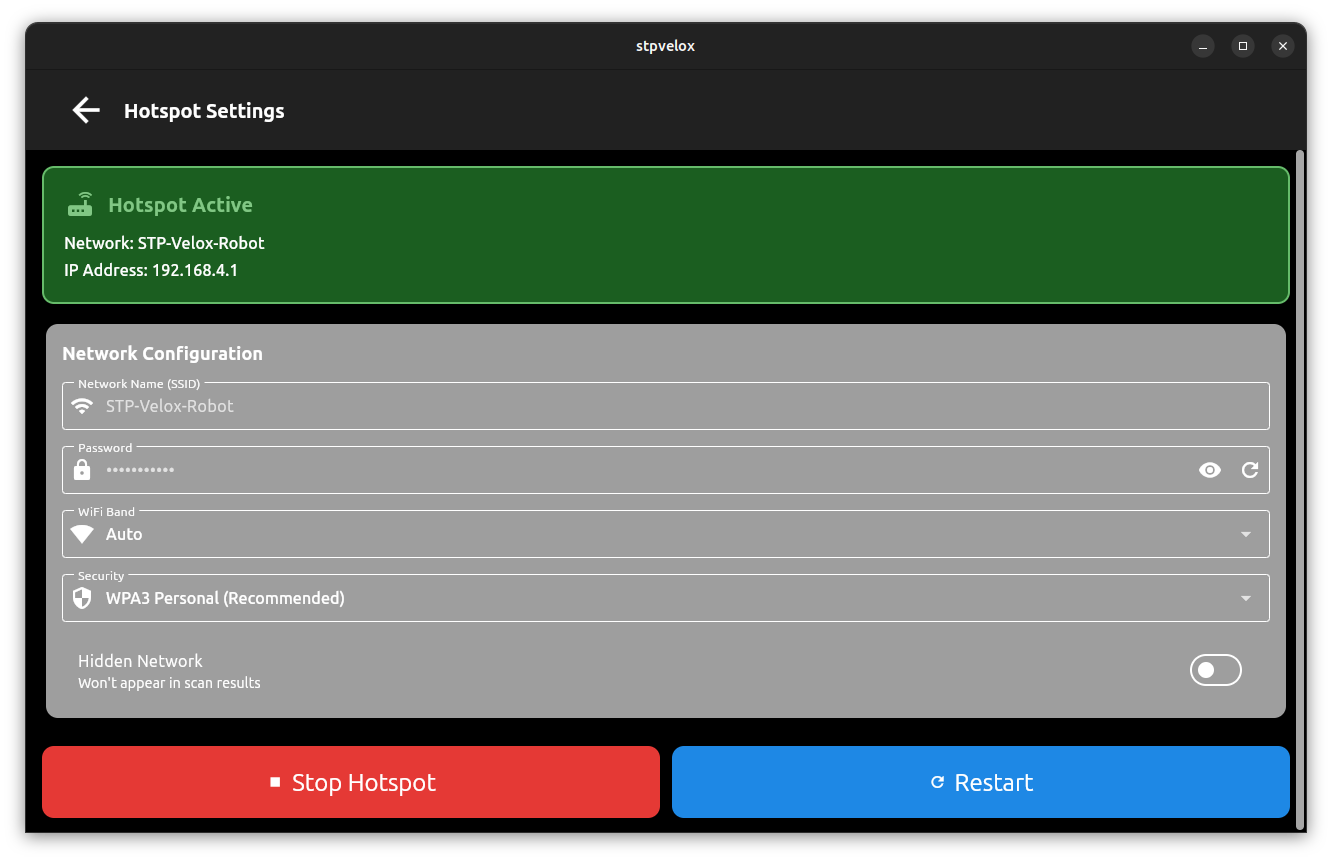
Allows the robot to create its own wireless access point. Configurable options:
| Setting | Default |
|---|---|
| Network name (SSID) | Auto-generated |
| Password | Auto-generated |
| Wi-Fi band | Auto (5 GHz / 2.4 GHz / Auto) |
| Security type | WPA3 Personal (also: WPA2 Personal, WPA3 Enterprise, WPA2 Enterprise, Open) |
| Hidden network | Off |
| Max clients | Configurable |
The hotspot status indicator shows inactive or active. When active, the assigned IP address is displayed.
LAN Only Mode
Used when the device is connected via an Ethernet cable. Displays information about the currently connected network.
All three modes provide a Device Info page showing IP address, SSID, encryption type, and MAC address.
Camera
Opens the camera configuration feature. Camera settings are managed through the dedicated camera sub-system.
Display
The Display sub-screen contains four tiles: Calibrate, Rotate, Screensaver, and Hide UI.
Calibrate
Starts the touchscreen calibration process. The screen presents five calibration targets in sequence (four corners and the centre). At each target you see:
- A red crosshair painted by
_CrossPaintercentred on the target point. - A Wombat PNG image (
assets/wombat.png) overlaid at the same position. - Instruction text: “Tap the wombat-crosshair (N / 5)”.
Tap each target as precisely as possible — hold the stylus or finger as vertically as you can for the most accurate result. After the fifth tap, BotUI computes a 6-coefficient affine calibration matrix using least-squares and:
- Persists the coefficients to
SharedPreferencesunder the keytouch_calibration. - Writes the calibration to
/etc/pointercal(the standard Linux tslib calibration file). - Automatically restarts
flutter-ui.serviceso the new calibration takes effect immediately.
Rotate
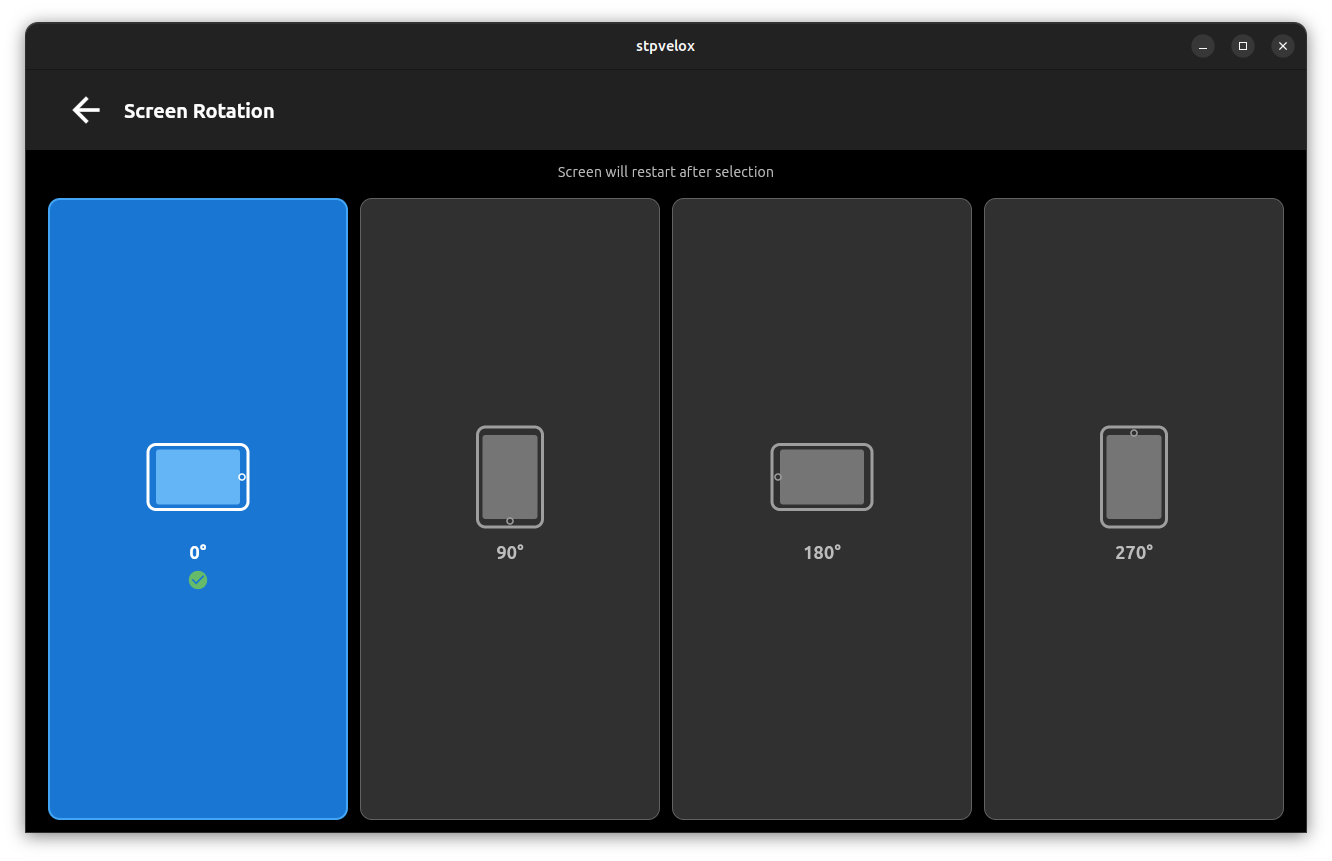
Changes the screen orientation. Four options are available:
| Option | Description |
|---|---|
| 0° | Default landscape orientation |
| 90° | Portrait, rotated 90° clockwise |
| 180° | Upside-down landscape |
| 270° | Portrait, rotated 90° counter-clockwise |
There is no 360° option. Selecting a rotation that is different from the current one updates the ExecStart line in /etc/systemd/system/flutter-ui.service (injects -r <degrees> into the flutter-pi command), reloads systemd, and restarts flutter-ui.service. A brief “Applying rotation…” loading indicator is shown while the service restarts.
The current rotation is remembered in SharedPreferences under the key screen_rotation.
Screensaver
Toggles the screensaver on or off. The tile label reflects the current state:
- Screensaver On (cyan) — screensaver is enabled (this is the default).
- Screensaver Off (grey) — screensaver is disabled.
Tapping the tile toggles the state immediately and persists it to SharedPreferences. The screensaver is active only on the Dashboard screen; it has no effect on any other screen.
Hide UI
Stops the BotUI Flutter application entirely. This is useful when you need access to the underlying Linux desktop or TTY without rebooting.
Important behaviours:
- A confirmation dialog is shown before the service is stopped. The dialog displays a warning icon and the message “The UI will stop. Reboot required to restore.” You must tap the red Hide UI button in the dialog to confirm; tapping Cancel dismisses the dialog without any change.
- Confirming runs
systemctl stop flutter-ui. The display will typically show a blank screen or a TTY prompt after the service exits. - Hide UI does not show system logs. To view service logs, use System → Services → [service] → Logs instead.
- To restore BotUI without rebooting: SSH into the Pi and run
sudo systemctl start flutter-ui.
System
The System sub-screen contains three tiles: Services, Reboot, and Shutdown.
Services
Opens a grid showing the status of six systemd services:
| Service unit | Display name |
|---|---|
flutter-ui.service | Flutter UI |
stm32_data_reader.service | STM32 Reader |
ssh.service | SSH |
raccoon.service | Raccoon |
ide-backend.service | IDE Backend |
raccoon-cam.service | Camera |
Each tile shows the service icon, display name, and a colour-coded status badge:
- Running (green) —
ActiveState=active,SubState=running. - Active but not running (orange) —
ActiveState=activebut a different sub-state (e.g.exited). - Not running (red) —
ActiveStateis anything other thanactive. - Not found (grey) — the unit file does not exist on this system.
Tap a service tile to open the Service Control screen for that service. The Service Control screen provides four actions in a 2×2 grid:
| Button | Action |
|---|---|
| Start / Stop | Toggles between systemctl start and systemctl stop depending on current state. |
| Restart | Runs systemctl restart. |
| Logs | Navigates to the Service Log screen showing live journalctl output. |
| Enable / Disable | Toggles between systemctl enable and systemctl disable to control autostart at boot. |
A refresh button in the top bar re-queries all service states on demand.
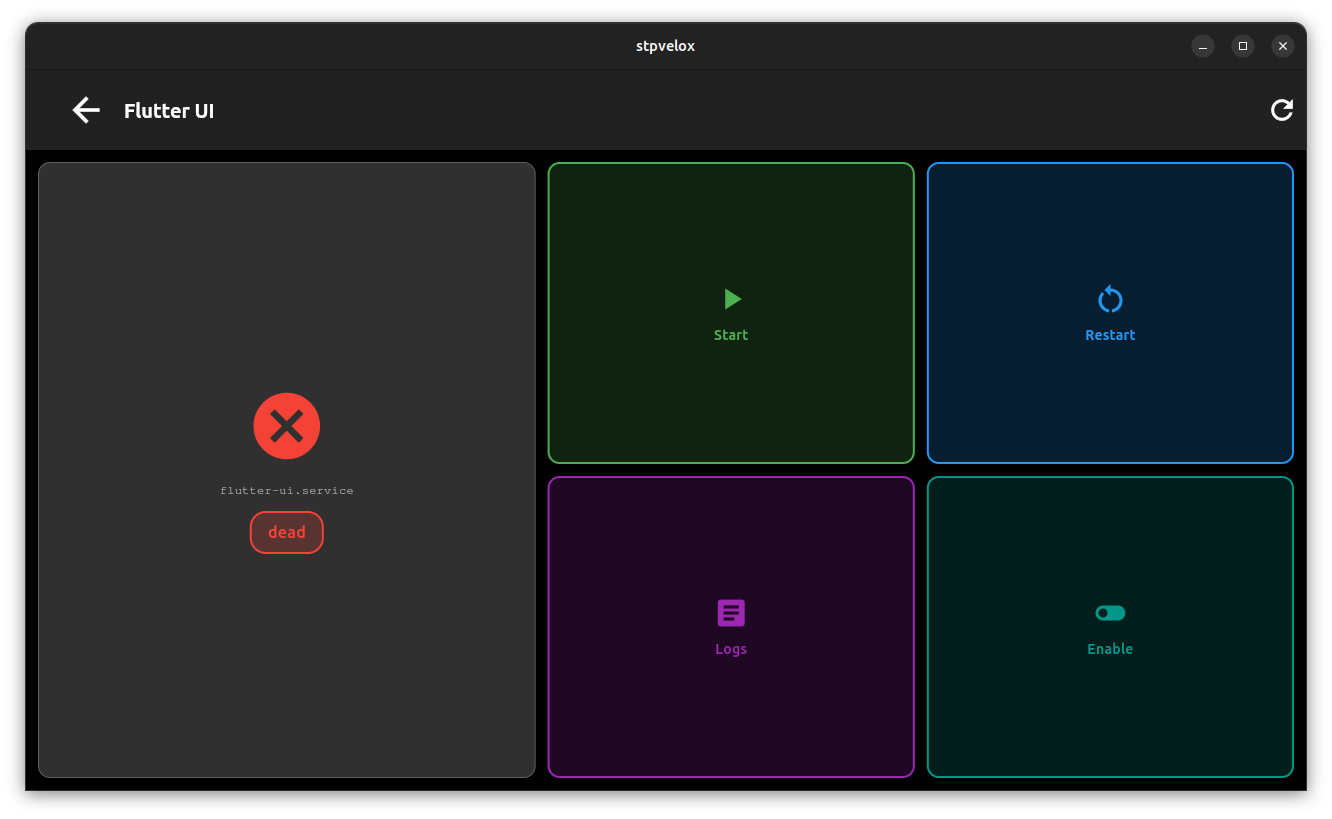
Reboot
Immediately reboots the device by calling reboot. No confirmation dialog is shown — tap it only when you intend to restart.
Shutdown
Powers off the device. A confirmation dialog is shown before the shutdown is executed. The dialog displays a power-off icon and the message “The device will power off.” Tap the red Shutdown button to confirm, or Cancel to return without shutting down. Confirming runs shutdown -h now.
App Status
The App Status screen shows the installed version of every RaccoonOS component. This is the first place to check when debugging “why is the robot behaving differently than expected” — it lets you verify that all components are at the versions you deployed.
Versions are fetched from the raccoon-server version endpoint at http://localhost:8421/version. The UI version is read from the APP_VERSION compile-time define (falls back to the pubspec.yaml version) and always shown locally, even if the server is unreachable.
Components Shown
| Component | What it is |
|---|---|
ui | BotUI Flutter application |
raccoon-cli | Command-line toolchain (raccoon sync, raccoon run, etc.) |
raccoon-lib | Python robot-control library |
raccoon-transport | LCM / shared-memory transport layer |
stm32-data-reader | C++ service that reads STM32 sensor data over SPI |
raccoon-cam | Camera service |
Each row shows the component name with its icon and either a green version badge (e.g. 1.4.2) or the text “not installed” in grey.
A refresh button in the top bar re-fetches versions from the server. If the server is unreachable an orange warning banner is shown at the top of the list, but the UI version is still displayed from local state.
Tip: Before a competition run, open App Status and verify that
raccoon-libandraccoon-cliare at the versions you tested with. A version mismatch between the toolchain on your laptop and the library on the robot is a common source of unexpected behaviour.
Robot (Personality)
The Robot sub-screen is a read-only inspector for the robot’s current personality configuration. It does not allow editing — personality traits are assigned at build time or via configuration files.
The screen is split into two panels:
- Left panel — a live animated preview of the robot face, showing the eyes blinking and gazing in real time using the same
RobotFacePainterused by the screensaver. - Right panel — a detail list of the personality attributes.
Personality Attributes
| Attribute | Options |
|---|---|
| Trait | Cheerful, Grumpy, Sleepy, Nervous, Chill, Dramatic, Brainy, Playful |
| Eye shape | Rounded, Standard, Angular, Pill, Blocky |
| Pupil style | Tall rectangle, Circle, Diamond, Horizontal bar, Cross, Solid |
| Eyebrows | Standard, Curved, Thin, Thick, Split, Notched |
| Eye size | Width and height factor (numeric multipliers) |
| Cosmetics | Antenna, Scar, Freckles, Blush, Circuit lines, Ear nodes, Crown dots, Chin mark (zero or more) |
| Palette | Palette name and variant name from the device colour scheme |